How to Start a Blog in 5 Easy Steps
Want to learn how start a blog but not sure where to begin? This comprehensive guide will walk you through setting up a successful blog in 5 easy steps!
If you are reading this post, chances are you either have recently started a blog or are interested in starting one, and you’re probably feeling a little overwhelmed and unsure of where to start.
Sound familiar?
Do you ever feel like you are missing something?
Our newest free guide will show you the exact steps for identifying THE missing piece that will get your business back on track. Gain clarity and know what you need to do next to start getting traction again.
The good news is, you have come to the right place!
This post will walk you through not just the technical aspects but also the big picture side of setting up a self-hosted blog. We will help you figure out exactly what to write about and walk you through setting up a structure, navigating the basics of blogging, and establishing a strong foundation that will enable you to hit the ground running in just 5 easy steps.
Our goal is to take the mystery out of blogging so that you feel less intimidated and more empowered to take action. But make no mistake—blogging takes work. You will have to be willing to dig in and learn new skills and commit to spending time and energy on your pursuit.
Are you ready to get started?
Let’s do this!
How to Start a Blog in 2022 in 5 Easy Steps

In this post you’ll learn:
- Step One: Determine Your What, Why, & How
- Step Two: Pick your blog name
- Step Three: Set Up a Self-Hosted Blog on WordPress or Squarespace
- Step Four: Install a Few Basic Plugins
- Step Five: Create a Structure, and WRITE!
Want more? Get our book, How to Blog for Profit (Without Selling Your Soul) for FREE here! (Just pay S&H)
Step One: Determine Your What, Why, & How

Blogging is a relatively new phenomenon, having only been around for about the last 15 years. There are still plenty of people who don’t understand what a blog is or why a person would want to read one, much less write one! The fact that blogging is so new and so impacted by technology means that blogging is also constantly evolving.
The truth is, the blogosphere today looks very different than it did 15 years ago, and five years from now it will probably look nothing like it does today. To step into this world is to step into an environment that is always changing.
As such, we think it is really important for anyone who wants to venture into the world of blogging to take a few minutes to think about your motivation and your objectives for diving in. Why did you consider starting a blog in the first place? What will keep you going when things get rough, or when other people don’t understand?
Take a few minutes to answer the questions below. Be sure to answer honestly and as thoroughly as possible, and remember to come back and revisit your answers on a regular basis—especially on those days where you feel like giving up!
- Why do you want to start a blog?
- What do you want to write about?
- Why is your message important?
- What do you hope to accomplish through blogging?
- How much are you willing to invest of your money and your time?
- How do you plan to reach your goals?
- What words of encouragement do you want to give yourself?
Step Two: Pick Your Blog Name
Your blog’s name can go a long way to helping—or hurting—your brand and its message.
It seems so simple, doesn’t it? Just pick a name. How hard can it be? Well, as it turns out, pretty darn hard sometimes!
The thing about your blog name is that once you go through the effort of finding a URL that is available and getting it all set up, and then letting people know where to find it, you are probably going to want to keep it for a while.
While blog names can be changed (so don’t panic if you are wanting to make a change), it is definitely easier to start with a name you are happy with.
Your blog name should capture the essence of your blog. It should be easy to remember (and easy to spell), and, ideally, it should be fairly short. In order to avoid confusion, it is also preferable that your URL be the same as your blog name, which means that your blog name needs to be fairly original, or you run the risk of having your preferred URL be taken already.
Coming up with a blog name means putting on your creativity hat and taking some time to do some serious brainstorming. If ideas aren’t your thing, you may want to enlist the help of a trusted friend or perhaps even your spouse or kids.
You’ll need to make sure that the name that you have in mind is actually available, which means checking GoDaddy or another domain name checker to make sure the domain name is available, as well as checking social media channels. It is also a good idea to do a Google search to find out what else is out there with that name, and to do a trademark search to find out whether a trademark has been filed for that name in a similar industry.
Get ready to brainstorm a bunch of different possibilities, then start vetting them to see which ones might work. You may also want to consider making up a word that fits what you want to talk about (like “mompreneur”).
Don’t Overthink It
If that sounds familiar, this is for you.
Now we know this might sound obvious, but over the past few years, we’ve seen way too many students who can’t wait to start their blog, and who have amazing ideas and a message to share, but they just get completely hung up on what to call it!
Instead, here’s how to approach it:
Set a Timer to Brainstorm Ideas
First, take a few minutes—no more than 10—and brainstorm a bunch of different possibilities. Think about what you’re passionate about, the genre you want to blog in, or something unique about you or your life. Be sure to set the timer—there is something about setting a timer that kicks your brain into high gear!
Here are some ways to help you best brainstorm ideas:
- In 2-3 sentences, describe what you want your blog to be about.
- Jot down as many blog name ideas as you can think of.
- Now, using the name ideas you have already come up with, think of alternative names using synonyms of the words you have already chosen.
- Write down your top 3 choices.
Make Sure Your Top Picks are Available
This page contains affiliate links, meaning I get a commission if you decide to make a purchase through my links at no cost to you.
Once your time is up, start vetting the names and phrases to see which ones might actually work. To do that, check to make sure the name you have in mind is actually available, which means checking Bluehost.com or GoDaddy.com, or another domain buying service, to make sure the domain name isn’t already reserved. You’ll also want to check social media channels. You’ll want your name and your social media handles to match or be pretty similar to avoid confusion.
While you’re researching, do a Google search to find out if any other blog, business or product has the same name. You can also do a trademark search to find out whether a trademark has been filed for that name in a similar industry. Is the URL available for any of your choices? If yes, then pick your favorite! If NO, then go back and try again.
There are countless possibilities when it comes to naming your blog, and unfortunately it’s easy to become paralyzed by choice. So let us be clear on this: the name of your blog will not make or break your success, so try very hard not to put too much pressure on yourself. What’s more important at this stage is to just get it up and going. You can even change the name later!
Ask for Feedback and Pick a Winner
Finally, your last step is to select your top 2 or 3 names and ask for feedback.
To summarize, here are some helpful tips on picking your blog name:
- Don’t overthink it.
- Set a timer for 10 minutes and write down as many names as you can think of.
- Search the internet to see if any of your top picks are available.
- Narrow your top choices down to 2 or 3, get feedback from others to pick a winner.
Step Three: Set Up a Self-Hosted Blog on WordPress or Squarespace

Now that you’ve decided on your name, it is time to grab the bull by the horns and actually SET UP your blog!
And that means the next step is to Set up Your Self-Hosted Blog on either WordPress or Squarespace.
We’ll be honest and tell you that THIS is probably the step that freaks people out the most, but we promise that it really doesn’t have to be hard. In EBA’s ACTIVATE we highly, highly highly recommend being self-hosted on WordPress.org (where you own your blogging platform) rather than choosing a hosted platform like Blogger or WordPress.com (where you don’t own the blogging platform). You want to have full control over your content.
Squarespace is another option that some people really like because it’s more simple, but WordPress offers the most flexibility, and a lot of people who start on Squarespace wind up transferring their blog to WordPress.org as their blog grows.
Pro Tip: WordPress.org is different from WordPress.com. We know, confusing, right? On WordPress.org, YOU own your blog, but on WordPress.com, WordPress owns your blog and can delete it anytime. You also cannot run ads or install plugins on a WordPress.com blog.
Setting up a self-hosted website sounds scary, but it doesn’t have to be! Let’s just take it one step at a time, okay?
We’ll be throwing out some technical terms, and we want to make sure we make this super understandable for true beginners. “Hosting” simply means where your blog will live on the Internet. Your “domain name,” like eliteblogacademy.com, is like your street address, and “WordPress” or “Squarespace” is a content management system for your blog, or like the house.
Bluehost is a hosting company and makes setting up all three of these elements the easiest. It is the only hosting service officially recommended by WordPress and has been the number-one recommended hosting service for their platform for over 10 years.
Best of all, if you sign up using this link, you’ll get a special offer of shared hosting at just $2.95/month (normally $7.99/month) for 36 months, as well as a free domain name for a year!

Next, you need to decide whether to set up your blog on either WordPress or Squarespace.
Jump to:
How to Start a Blog on WordPress
How to Start a Blog on Squarespace
Step Four: Install a Few Basic Plugins
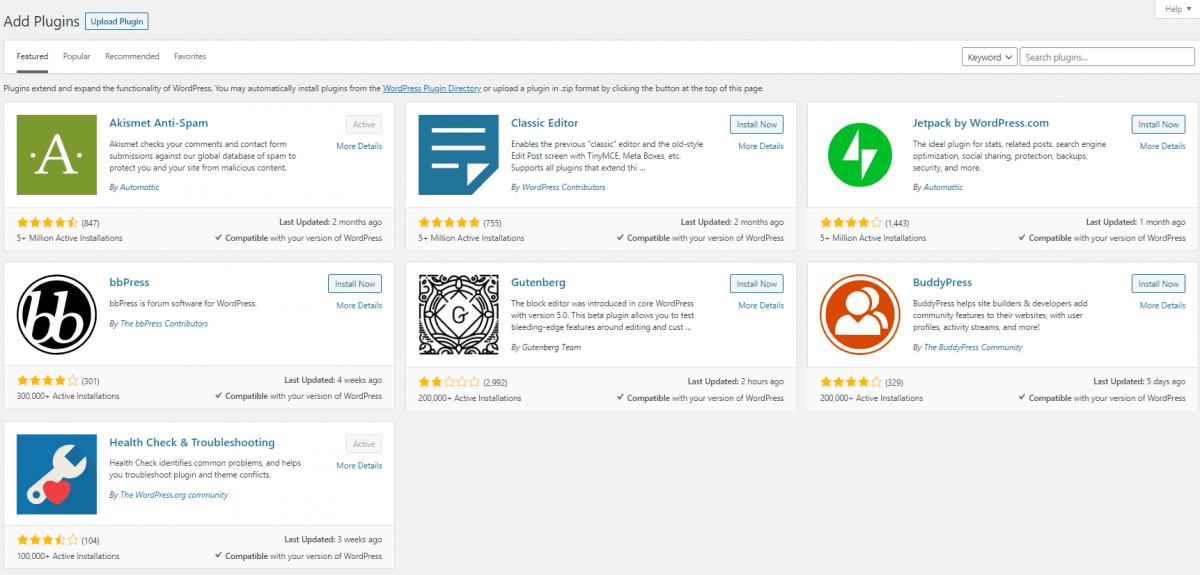
If you set up your website using WordPress, you will want to install a few features to help it run more smoothly and efficiently. These are called Plugins. Squarespace does not offer plugins, so if you set up your site using Squarespace, you can skip this step.
Here are a few WordPress Plugins we absolutely recommend:
Social Sharing Plugin
Social sharing plugins allow you to add social sharing buttons to your site, making it very easy for readers to quickly share your content, which is the ultimate goal!
We like:
- Social Warfare
Social PugNow called Grow by Mediavine
To learn more about getting social media set up for your blog as you’re just getting started out, check out these posts:
Setting up your social media accounts
Setting up your blog so other people promote your social media (so you don’t have to!)
SEO Plugin
SEO plugins help give you the tools and suggestions needed to make your site and posts Search Engine Optimization (SEO) friendly. Google will try to guess what your article is about and serve it to people accordingly, but if you are trying to specifically talk about the “best fish recipe ever,” SEO plugins will show you how to structure your post so that you and Google can work harmoniously and your content will be served up to the right audience.
We like:
- Yoast
Caching Plugin
A caching plugin generates static HTML pages of your website and saves it on your server. Each time a user tries to access your website, your caching plugin serves up the lighter HTML page instead of processing the comparatively heavier WordPress PHP scripts. Did that explanation have you scratching your head? Simply put, a caching plugin provides your readers with a quick and streamlined experience instead of getting all the bloat that sometimes happens to a website over time.
We like:
- WP Super Cache
- WP Rocket
Anti-Spam Plugin
An anti-spam plugin filters through comments and form submissions and filters out the spam. Pretty straightforward!
We like:
- Akismet
How To Install A Plugin
To install a plugin on your WordPress site, log in by visiting nameofyourblog.com/wp-admin.
Enter your username and your password and click login. Here, you will be in the back end of your site, called the WordPress Dashboard. To install plugins, visit the left-hand side of your dashboard and click “Plugins” (looks like a plug icon). This is going to bring you into a page of plugins that are already installed.
Bluehost installs a number of plugins that a lot of WordPress users commonly use. Some of them you may not end up using and you can go ahead and deactivate and delete those a little bit down the road (you will want to have as few plugins as you can, because plugins take up space on your site and can slow down your site speed and muddle your user experience).
Pro Tip: If something looks weird on your site or your site is not performing as it should, chances are, there’s a plugin issue. Plugins often don’t play nice together or with your theme. If you have an issue, begin by deactivating all of your plugins and start reactivating them one by one until you have found the problem. When this happens, there is usually a suitable secondary plugin you can use instead that will work, or you may find you can lose it altogether.
Once your plugin is installed, click activate. You will see it in your plugin list. At that point every time you install a plugin there’s typically a “settings button.” You want to go to your settings and then walk through each tab and get that set up.
Here are some more of our recommendations for the best free WordPress plugins!
Step Five: Create a Structure, and WRITE!
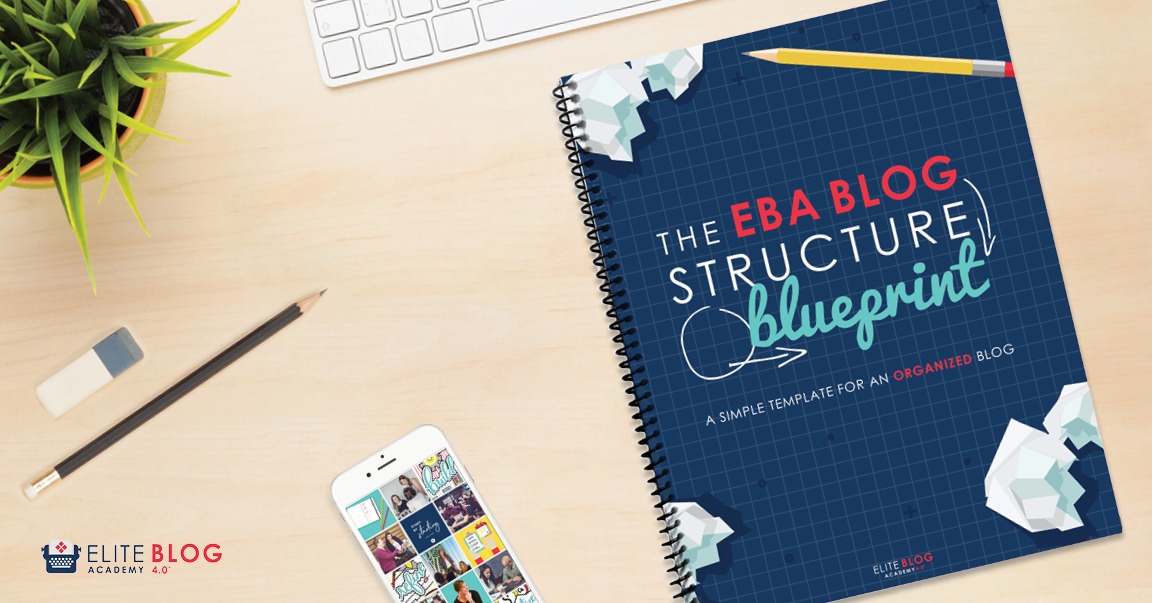
A well-organized blog is critical for success as a blogger. Our free printable blog structure blueprint will help you organize the structure and layout of your blog so that it makes sense to your readers, allows them to know at a glance what your blog is about, and helps them easily find what they are looking for.
Get Organized
Start with your blog name, followed by your blog’s main theme and the tagline that you decided on in Part 1 of this post. Remember that it is perfectly okay to write about a variety of topics—after all, most of us are not interested in just one single thing—but there does need to be some sort of cohesive overarching theme that ties everything together and prevents your blog from feeling completely random. Random tends to scare people away because they don’t know what to expect, and that is not a good thing.
Break it Down
From there, divide your main theme into a few distinct categories, and then divide those categories into subcategories. Keep in mind that the blueprint we’ve provided is just a guideline for how this might look—there is no rule that you have to have five different categories, and then six sub-categories under each category. You might have four categories, and of those four, one might have six sub-categories while another has only three, or none at all.
Ultimately, your goal is to create a clear, organized structure for your blog, but that can happen in many different ways. The right number of categories and subcategories is the number that it takes for your blog to feel cohesive and organized.
Again, our free Blog Structure Blueprint will help you create a clear and organized structure for your blog! GET IT HERE.
Find Your FOCUS
Of course, the only way to TRULY start blogging is to actually start writing blog posts! So now that you have your blog set up, it is time to get busy writing and publish your first post.
Yep, that’s right, you are actually going to PUBLISH a blog post! One that people can actually read!
Because if you are anything like MOST of our Level 1 members of the ACTIVATE coaching program, you’re thinking there are probably a million and one things you need to do before you can “officially” launch your blog.
Raise your hand if you’ve ever said anything close to the following:
“I need at least 30 posts saved up and ready to go before I can launch my blog!”
“I just need to have everything perfect… Then I’ll be ready to launch.”
“I need to figure out my long-term strategy before diving in.”
If your hand is up, then we have some really important news for you: The best way to launch your blog is to just START.
The reality is that no matter how prepared you think you are, your blog will change over time. Who you are when you launch isn’t who you’ll be a week later, a year later, or five years later. And that means you don’t need to have it all figured out from day one. It’s a process, and as we grow and change, our blogs will grow and change right along with us.
The best way to launch your blog is to just START. No matter how prepared you think you are, your blog will change over time. You don’t need to have it all figured out from day one.As far as the post itself is concerned, here are a few ideas:
It can be an introduction about yourself, an explanation of what you want to blog about, or even some sort of manifesto—the point is just to get used to the idea of writing SOMETHING, and then to hit publish and make it live!
Don’t worry that your blog isn’t pretty yet, or if you don’t have images and graphics. Don’t worry that it is not polished or perfect. Publishing that first post is the hardest step, and so if you can get it out of the way today, you will be ready to take off!
We recommend using the FOCUS method to write your posts, which will show you how to structure your blog in a way that makes it easy for your readers to consume your content! You can get our free FOCUS cheat sheet here.
Now, you might be wondering where to go from here, and if you’re just getting started with blogging, coming up with a strategy to get your blog to grow can feel totally overwhelming. Have you seen how much information is out there? Sure, it’s great that we have so much information at our fingertips… but we think it’s safe to say we’ve crossed over from “helpful amount of information” to “too much of a good thing.”
The answer is to follow a single blogging framework. This will simplify your path to success, and it’s 100% the approach we recommend.
A framework is a step-by-step process you can follow that tells you exactly what to do, how to do it, and when to do it to be successful with your blog, and how to turn your blog into a profitable, sustainable business. And when you follow a framework, everything you do builds on what we did in this post in order to accelerate your results and get you where you want to go—faster and easier than if you try to figure it out on your own.
Trust us—there is a LOT of information out there, and it can be so overwhelming! You will spend so much time spinning your wheels instead of putting your nose to the grindstone and doing what you need to do to find success.
A framework approach is exactly what we teach at Elite Blog Academy in the ACTIVATE coaching program. It’s a methodical, step-by-step approach that helps you make the right moves in the right order, which ultimately makes things a whole lot easier. And it’s been proven to get results for those willing to put in the work.
There’s no way around it: in order to get a great blog framework, you need to invest time and money into the right tools and the right education—exactly what ACTIVATE will provide.
And we know this can be a tough pill to swallow when you are just starting out. It feels scary to invest in yourself before you’ve made any money.
Maybe you’re worried that you won’t get your money’s worth or that the content won’t be anything you haven’t already heard before. Deep down, though, there is probably a deeper fear—the fear that you might fail.
But here’s the thing—since 2014, we have worked really, really hard to create a program that has the potential to transform not just your blog, but your whole life.
You see, there’s an entire community of alumni who have experienced massive success with our proven framework, and they’re ready to help you succeed as well.
And so, while coaching that goes as in-depth as this one does would normally be priced much higher, we wanted to make sure it was affordable enough for anyone who is ready to put in the work.
That’s why we offer EBA’s ACTIVATE at a fraction of that! We can help you take your business to the next level with our proven path. Join our waiting list today to get notified when registration opens again and get our 6 Figure Blog Plan for free!
With ACTIVATE, you can take the next single most important step that can make all the difference in your life one year from now.
Just think about it.
What if, a year from now, you were able to earn a full-time income from your blog? What if you could work from anywhere and have the life you’ve always dreamed of? How would your life be different?
As you probably already know, public enrollment for ACTIVATE only happens once every 3 months, and for the sake of all our students, we only open up a limited number of new spots each quarter in order to make sure that we can continue to provide the highest quality experience.
Multiply your efforts, maximize your time, and get the accountability and support you need to succeed—we want nothing more than that for you. Join our waiting list today at eliteblogacademy.com to be the first in line to be notified when the ACTIVATE coaching program opens its doors again.
We’ll see you there!
To summarize…
How to start a blog in 5 easy steps:
- Determine Your What, Why, & How
- Pick your blog name
- Set Up a Self-Hosted Blog on WordPress or Squarespace
- Install a Few Basic Plugins
- Create a Structure, and WRITE!